diy silk screen
One of the easiest ways to get a design on almost any surface is to use the photo emulsion process. Here gently rinse out entire screen- the emulsion where the image was will completely wash away as well as any excess emulsion that could run into image while drying.

Pin By Old Son On Diy Diy Screen Printing Diy Prints Screen Printing Techniques
Once youve made the screen its ready to print time and time again.
. Apply a thin layer to both sides of the screen leaving a 1 inch 25 cm border around the screen. Prep and exposing screen. Turn the screen over and while keeping it elevated with one hand use the other hand to smooth the emulsion evenly on the other side. The silk screens you will make will produce a high quality image that will save you time and money.
We like the Color Line Paints brand Silk Screen Pastes which work incredibly well with our stencils when printing on glass and they can even be used on ceramics. Screen printing is the pinnacle of DIY culture. Emulsion side should be facing up towards sunlight 5-10 minutes. The thing you cant skimp on is the emulsion.
Cover a silk screen with emulsion gel. Screen print any design you want with this easy DIY silk screen hack to make mini banners for your roomGet more Crafty Lumberjacks herehttpswwwyoutube. Add a bit of wood glue to the inside ends to help form a tight bond. Dec 23 2021 - Explore Kellys board Silk Screen followed by 1523 people on Pinterest.
Unlike most silk screening Instructables I have found this method allows you to silk screen without messy photo emulsion paste. Its dead easy. In your dark room run a bead of emulsion across the top of your screen. Rotate the tiles so the stencil cures evenly.
After rinse set screen aside to dry. Even panty hose doubled over will work. Place the silk screenimageglass sandwich in the box glass side up Turn on the light and let it cook for about 25 minutes. If you want to make it permanent you could screw the wood or bolt it onto the railing.
Indeed you can screen resist material for most normal boards. Bug lights are fine Let it dry to manufactures specs. With a fine mesh well-stretched screen photoemulsion proper orientation and decent resist ink 14mm tracespace can be done routinely. Attach a piece of pallet wood onto the 2 x 4 that is attached to the railing with wood screws.
The emulsion will come with a. Buy a 20 tub of silk screening emultion it will last MONTHS You smear the emulsion on both sides of the screen in a room with a yellow safe light. Adhesive stencils work very well for all types of fabric projects such as this a pparel tutorial from a few weeks ago. Coat the silkscreen with photo emulsion using your squeegee.
It took us maybe an hour to make 8 new screen printing frames. Normally silk screening also called screen printing is a process involving chemicals light sensitive materials and lots of setup. After emulsion has been exposed remove transparency and take to wash out sink. Pull the emulsion across the screen using the squeegee.
Rinse the screen in the provided tub and use the sponge to remove excess blue stuff from your screen. Scrape any excess emulsion back into the bottle. To do something fancier you may need to budget another c-note. Place the hinge clamps onto the mounted 2 x 4 and screw.
Once the image is burnt into the screen ink is spread over the screen and pushed through to the material below. Lay flat to dry. Silk-screening or screen printing is a great way to personalize your gear. Pull in both directions until one side is coated.
Then you can return to normal lighting. This process solidifies the emulsion to the silk screen mesh making it permanent and reusable. Screw the corners together tightly and allow the glue to dry. Mix the 2 parts of the photo emulsion together.
You can silkscreen on nearly any surface including paper fabric and even plastic. Turn on the 150-watt bulb and burn the screen. Its a very basic process that has unlimited outcomes. Typically we have used HiDef stencils to print on glass and other non-porous surfaces but Color Line silk screen pastes are recommended for 120 mesh stencils so our Standard screens work better with these paints.
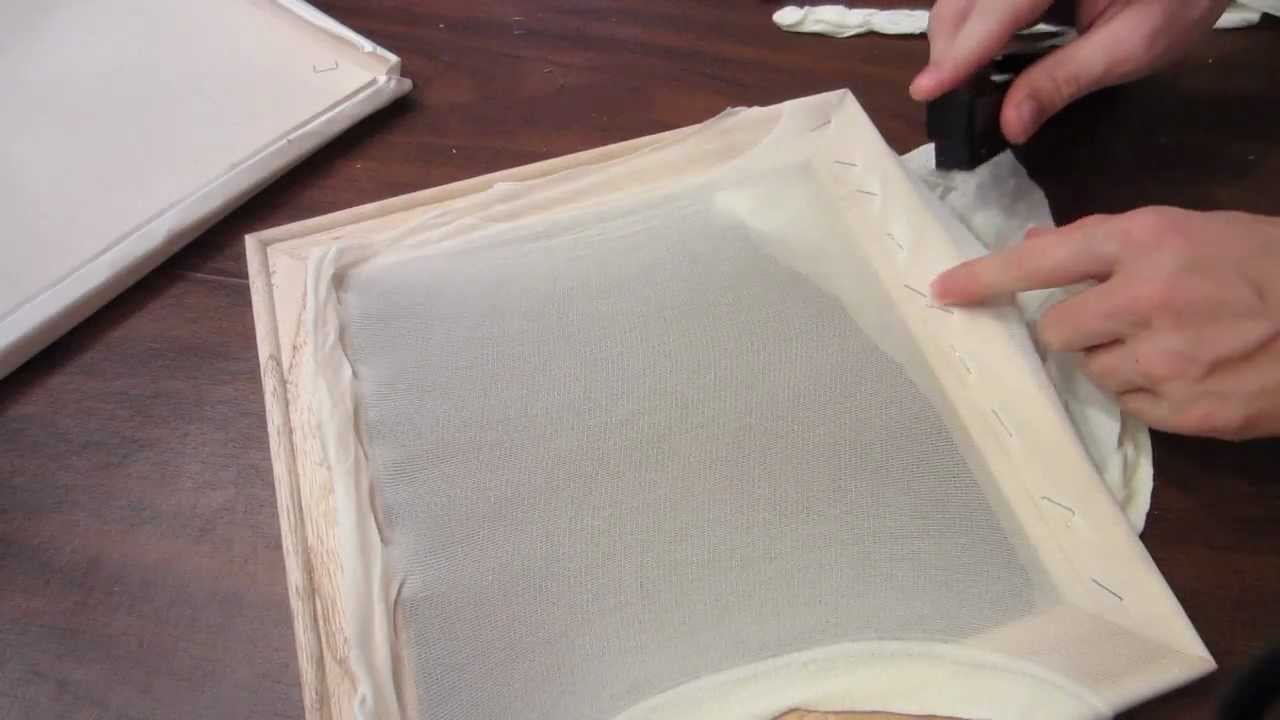
Check out these 15 fantastic DIY silk screen designs that will help you make yourself and your friends some awesome shirts trinkets and basically anything made of fabric that you definitely wont find in stores. COATING WITH PHOTO EMULSION. Staple your silk onto the frame with a regular staple gun so its very tight. Photographic emulsion is a gel-like substance with light-sensitive properties.
Were going to show you how easy and accessible silk screening can be with the use of our adhesive stencils. Using clear tape position and secure your image to the surface of the silk screen. When applied to fabrics like silk it can transfer images from photographic paper to create stencils. This is silk screen production the cheap and easy DIY way.
Trim the edges the silk. In order to make this easy silkscreen for making cool T-shirt logos and designs youll need some acrylic paint paintbrushes cheap net curtain patterned or plain vinyl sign sheets blackboard or cork board and some fabric paints to paint with. Again check the directions on your emulsion but a good general guideline is to leave the 150-watt bulb on for between 30 and 45 minutes. If its windy place weights on the stencil like tiles from a hardware store.
Tape the outside of the silk onto the frame with painters tape. Get some decent porous fabric. For simple screening supplies will run well under 100. Arrange your pieces into rectangles and drill holes at the corners through both pieces.
See more ideas about diy screen printing screen printing silk screen. This Instructable will show you how to make your very own reusable silk screens for printing on fabric or paper. Silk screening is a printing technique that involves burning negative images into a silk-based or synthetic screen with emulsion fluid and light.

Pin On Teaching Art

Learn The Screen Printing With Silk Screening 101 Make Diy Screen Printing Silk Screen Screen Printing

Pin By The Big Machine On Printmaking Diy Screen Printing Diy Prints Screen Printing Machine

Pin On M A K E M E

Pin On Kid Friendly Crafts

Posting Komentar untuk "diy silk screen"